git - 1337 edition - II
This is the second part of Git - 1337 edition, if you haven't gone through the first I'll recommend you going through the first part.
Fixing Mistakes
Everyone wants to know is how do I fix mistakes? There are a few tools that I use checkout, reset, revert and clean. After this section you're not gonna have a hard time figuring out which commit do you need for what scenario. The prerequisite here is having a clear idea of git areas.
My effort will be for you to not go to StackOverflow next time you want to fix your mistake.
git checkout
It helps you to restore working tree files or switch branches. Also, do you remember when I talked about that staging area contains a copy of your current commit to knowing that you have modifications or not? Hold on to that thought.
What happens when you check out a branch?
- Change HEAD to point to the new branch.
- Copy the latest commit snapshot to the staging area.
- Update the working area with your branch contents.
Checking out a branch is generally a safe operation, nothing bad's going to happen. And git's gonna warn you if you're gonna lose data.
What happens when you git checkout -- file ?
It replaces the working area copy with the version from the staging area. (i.e copy of the latest commit)
This is a destructive operation, it'll overwrite your file for sure, without warning.
Also, if you're curious what those '--' mean, want to think about it?
What happens when you git checkout < commmit > -- file ?
- Update the staging area to match the commit
- Update the working area to match the staging area
- Using this command we can restore a deleted file, something like this:
git checkout <deleting_commit>^ -- <file-path>
# we specify ^ (hat) to point to the parent commit and get the file
This is a destructive operation too, it'll overwrite your files in staging and working area.
So whenever you have unsaved changes and you got to check out a file or commit, wait, think, commit, stash, do whatever you need to do to save your changes.
If you're curious as to what those '--' double dashes refer to ? Give it a thought before looking at the spoiler.
It signifies the end of command operation and the beginning of positional parameters. It's to differentiate between a branch and file with the same name, as then checkout would get a lot ambiguous.
git reset (Playing with time)
Oh, This is a big one. I find people tend to google how to undo the last commit, and then copy and paste. But understanding reset will supercharge your workflow.
Also, it's one of those commands, where depending on the arguments, the actions are different. One difference between git checkout and git reset is that checkout will move the HEAD but the branch stays the same, but reset will move the HEAD as well as the branch reference, i.e. your branch is now modified.
Git reset can be used for commits and file paths.
- For commits, it moves the HEAD pointer and optionally modifies files.
- For file paths, it doesn't move the HEAD pointer but modifies files.
So a cheat sheet for git reset should be good enough for you elites'.
git reset --soft HEAD~
# move HEAD to the previous commit, that's it.
git reset --mixed HEAD~
# move HEAD to the previous commit and get a copy of those files to the staging area. (default)
git reset --hard HEAD~
# All of the above and change the working area with the same copy #destructive
If you'll notice you have a way to change history now. You're playing with time and to protect the time continuum, do not ever push history changes to a public or shared repository. It'll only mess with other people's timeline. We'll talk about git revert soon. Use that instead.
Let's talk about git reset -- < file >: It doesn't move the HEAD pointer but it copies that file from the current commit to the staging area.
And if you specify a commit, git reset < commit > -- < file >: It won't move the HEAD but will copy the file from given commit SHA to the staging area. (same as mixed reset, except moving HEAD)
For files git reset can't take flags like --soft, --hard or --mixed. It'll always reset the staging area only.
Undo a git reset with ORIG_HEAD
There is a reference called the original head. or ORIG_HEAD. When you do an operation like a reset or a merge, it saves where HEAD was before that operation.
git reset ORIG_HEADgit revert (the safe reset)
Git revert creates a new commit, it introduces the opposite changes from the specified commit. The original commit will stay in the repo and you do not mess with other people's timeline.
On a serious note, use revert if you're undoing a commit that has already been shared, as revert doesn't change history.
git revert <commit-sha>git clean
Git clean will clear your working area by deleting untracked files. PEACE.
There are a few flags associated with git clean.
- --dry-run to see what would be deleted
- -f to do the deletion
- -d flag will clean directories as well.
git clean -d -f # warning can't be undoneRebase & Amend
Alright, if you directly jumped here from the Outline, it'll be worth it man. Let's do this.
Before getting into rebase, let's understand amend.
Amend
It's a quick and easy shortcut to make changes to the previous commit.
Have a look at the following example.
❯ git add a.txt
❯ git commit -m "add alphabets"
[master 1b6cb34] add alphabets
 1 file changed, 0 insertions(+), 0 deletions(-)
 create mode 100644 a.txt
❯ # oops forgot about b.txt
❯ git add b.txt
❯ git commit --amend
[master 4544171] add alphabets
 Date: Fri May 1 17:07:57 2020 +0530
 2 files changed, 0 insertions(+), 0 deletions(-)
 create mode 100644 a.txt
 create mode 100644 b.txt
It added b.txt to the last commit, but then if you'll notice the SHAs are different. I hope you remember, commits can't be edited. And by commits, I'm talking about the commit object. Even if everything is the same, the date is gonna be different. Anyways here the content is different itself.
And if you're thinking where that old commit went, it's now dangling and will be garbage collected.
Rebase
Finally, let's do this. Imagine my feature-dark-mode and master branch have diverged. And we don't want to have a messy merge commit in our history. So what can we do?
We can pull in all the latest changes from master, and apply our commits on top of them by changing the parent commit of our commits. So basically, rebase = give a commit a new parent. i.e, a new base commit.
Lets consider this simple scenario:
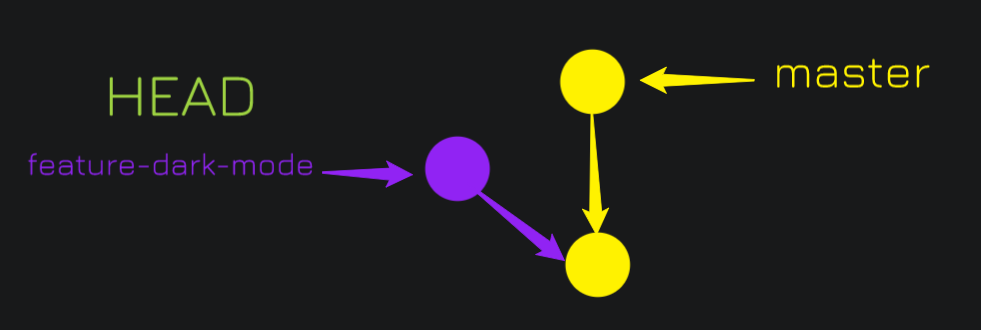
I was working on the feature-dark-mode branch and at the same time, some developer added a commit to master. Currently HEAD is on feature-dark-mode.
Let's run
git rebase master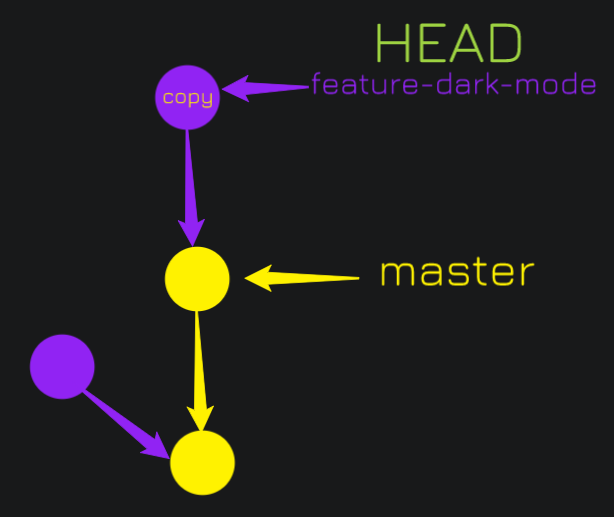
It created a new commit, actually a copy of the commit on the feature-dark-mode branch, and that branch is up to date with the latest commit on master. This makes resolving merge conflicts much easier. And people should rebase pretty frequently. It makes history a lot neater and cleaner.
Let's have a look at a comparison between a rebase and a merge.
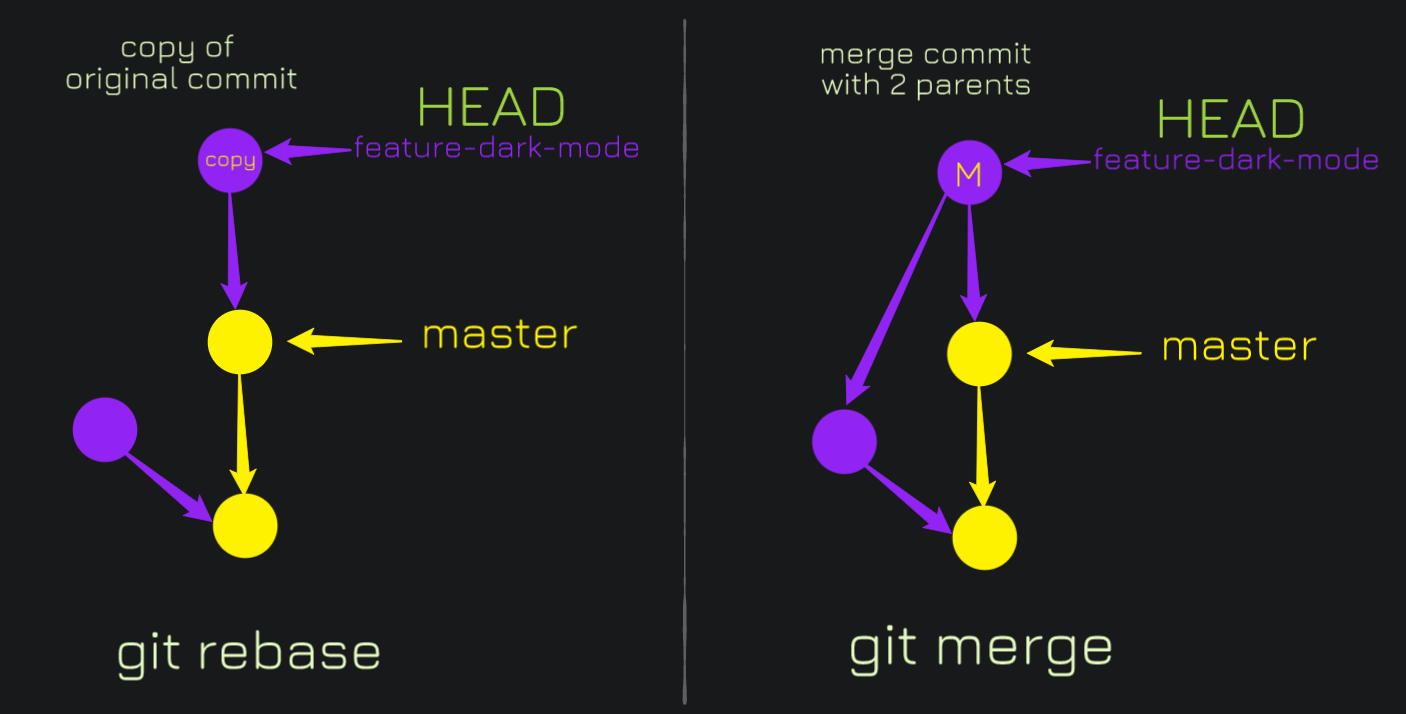
You can see a merge creates a merge commit with two-parent pointers (and the hard work of solving a merge conflict with the master) whereas rebase creates a simple copy. But the hype and power of rebasing come from interactive rebasing.
Before commits are replayed on top of the new HEAD (when you rebase), commits can be
- edited
- removed
- combined
- re-ordered
- inserted
Interactive Rebase (rebase -i or rebase --interactive)
Interactive rebase opens an editor with a "list of todos"
- in the format: < command > < commit > < commit-msg >
- git will pick the commits in the specified order, or stop to take an action when editing or conflict occurs.
You can also run interactive rebase with a shortcut, t.e. provide a commit that you want to start fixing from:
git rebase -i <commit_to_fix>^hat (^) points to the parent commit.
Some of the rebase options and this will come up when you do it interactively are as follows:
- pick: keep this commit.
- reword: keep the commit, just change the message.
- edit: keep the commit, but stop to edit more than the message.
- squash: combine this commit with the previous one and stop to edit the message.
- fixup: combine this commit with the previous one and keep the previous commit message.
- exec: run the command on this line after picking the previous commit
- So if you're rebasing and you want to do a test in the middle, exec is your tool.
- drop: remove the commit (note: the same thing will happen if you just remove the line)
You can only enjoy this when you do it on your own. Make some rebases today and if you get stuck drop them down in the comments.
Tip: Use rebase to split commits
Editing a commit can also split it into multiple commits!
1. Start an interactive rebase with -i
2. Mark the commit with an edit
3. git reset HEAD^
4. git add
5. git commit
6. repeat (4) & (5) until the working area is clean
7. git rebase --continue
Alright now you have an idea of rebase, let's come back to amending. What if we want to amend an arbitrary commit?
Tip: "Amend" any commit with fixup & autosquash
Steps:
1. git add new files
2. git commit --fixup <SHA>
    - this creates a new commit and the message starts with a "fixup!"
3. git rebase -i --autosquash <SHA>^
4. git will generate the right todos for you. Just save and quit.
Rebase ProTip: Before you rebase/fixup/squash/reorder, make a copy of your current branch using git branch command, and if rebase "succeeds" but you messed up.
git reset backup_branch --hardAnd you're back in business.
Rebase Advantages
So rebase is incredibly powerful, let's summarize what we learned.
- You can slice and dice your git history.
- It's easy to fix previous mistakes in code.
- You can keep your git history neat and clean.
So commit early and often and locally rebase to your heart's content. So as a best practice, you can follow the following mantras:
- commit often, perfect later, publish once.
- when working locally, commit whenever you make changes, it'll help you be a more productive developer.
- before you push work to a shared repo, rebase to clean up the commit history.
- never rewrite public history, you could cause massive merge conflicts.
Forks and Remote Repos
Distributed version control, before git, older systems like SVN, CVS had one central repository, one master server, everyone would push it and pull from it. Git doesn't work that way. Because of the efficiencies of how git stores data, because of the compression, and these really interesting algorithms, we're able to store the whole git repository with all of its histories on our local machines. We don't need the local network to be able to work on our repository unless your codebase is just absolutely huge, it's really easy to check out branches, pull down new changes.
Here's a comparison over distributed and central version control system.

There is an interesting story about Microsoft. So MS Windows was on one git repo, but because the codebase was so old and so huge they started running into problems. So unless you're planning on writing the next windows, the way Git works now is probably just fine.
Github vs Git
Many people don't understand the concept of git and GitHub, the key is just collaboration.
Git:
- Open-source version control software
Github:
- Repository Hosting
- Browse Code
- Issues
- Pull Requests
- Forks
Github has been a key driver in open source collaboration since it came out in 2008.
Remotes
A remote is a git repository stored elsewhere - on the web, in GitHub, GitLab, bitbucket, etc. origin is the default name git gives to the server you cloned from. When you clone a remote repo, git will fetch the whole repo and make a local copy in your .git folder. You may have different privileges for a remote. (r/w for some, r only for others). To have a look at you remotes:
❯ git remote -v # verbose
origin  git@github.com:karngyan/karngyan.github.io.git (fetch)
origin  git@github.com:karngyan/karngyan.github.io.git (push)
When you clone someone else's repository, you'll have permission to pull changes but not to push code.
Forks, Pull Requests & Upstreams
A fork is a copy of a repository, that's stored in your Github account. You can clone your fork to your local computer and because that fork is in your GitHub account, all of a sudden there's no restrictions. You can do whatever you feel like with your copy.
Merging changes to original project from a fork: The way you do that is via a Pull Request. It's like a "knock knock, hello maintainer of this project, I have made this awesome cool new feature, I fixed this bug, would you please accept the changes that I am proposing?"
Staying up to date: While you work on your fork, other changes are getting merged into the source repository. To stay up to date, set up an upstream.
Upstream*: The upstream repository is the base repository you created a fork from. Unfortunately, this is not set up by default and I recommend you do that manually.
❯ git remote add upstream https://github.com/ORIG_OWNER/REPO.gitNow you can pull down changes that get added to the original repository after you forked it.
Github Workflows
The most common workflow, is the triangular workflow.

Tracking Branches
You can track a branch to tie it to an upstream branch. The bonus to this is you can git push/pull with no arguments. To check out a remote branch with tracking use:
git checkout -t origin/feature-dark-modeYou can also tell git which branch to track the first time you push:
git push -u origin feature-dark-modeTo have a look at the branch information along with upstream tracking info:
❯ git branch -vv
  feature-dark-mode 874eab1 [origin/feature-dark-mode] add logo
* master            a45c454 [origin/master: ahead 4] update bio
It'll also show you how many commit you're behind/ahead.
Fetch
Git fetch is important for keeping your local repository up to date with a remote. It pulls down all the changes that happened on the server. But it doesn't change your local repository.
Pull
Pulling will pull down the changes from the remote repo to your local repo, and merge them with a local branch.
So under the hood: git pull = git fetch && git merge. if changes happened upstream, git will create a merge commit otherwise a fast forward.
git pull --rebase # pull with a rebase built-inThis will fetch, update your local branch to copy the upstream branch, then reply any commits you made via rebase.
Bonus: When you open a PR, there will be no unsightly merge commits. Although don't use rebase on a branch that has local merge commits, it'll get complicated man.
Push
Pushing sends your changes to the remote repository, git only allows you to push if your changes won't cause a conflict.
To see commits which haven't been pushed upstream yet: git cherry -v
Quick Note: Git doesn't automatically push local tags to a remote repo. To push tags:
git push <tagname>
git push --tags
Contributing to open source projects - Pull Requests
- Before opening a PR
- Keep commit history clean and neat. Rebase if needed.
- Run project tests on code (obviously)
- Pull in upstream changes, preferably via rebase to avoid merge commits.
- Check for CONTRIBUTING(.md/.txt) in the project root.
- Even if you're working on your organization project, I guess creating a fork and working on the same is much better.
- Mistakes are less likely to happen if no one is pushing to the "source of truth" for your codebase.
- After opening a PR
- Explain your changes thoroughly in the pull request.
- Link to any open issues that your pull request might fix.
- Check back for comments from the maintainers.
- When accepting a PR
- Squash and merge or rebase with care, you'll lose context of the feature when you squash and rebase.
- Hence a merge is recommended.
GitHub
Shortcuts
Millions of people use GitHub day to day, theses shortcuts will help you navigate like a pro.
- Press '?' on any github.com page for a list of shortcuts.
Continuous Integration
This will be very brief here because I know I can write up another 5 blogs on this.
So if you're a person who merges smaller commits frequently instead of one big merge, CI can make your life easier. This also means your feature can be released quicker.
There are caveats like, CI can only work well when there are tests that ensure that new commits did not "break the build". It's also possible to perform a deploy at the end of the CI build!

Travis CI (Integrates well with GitHub)
There are multiple reasons to use this:
- Free for open-source projects.
- It's easy to specify what commands you need to run tests.
- It's also very easy to test over multiple versions of a language/libraries.
- Tests run automatically on branches and PRs.
Set up:
- Visit travis-ci.org, log in with your GitHub account.
- Add a .travis.yml config file to the root directory of your repo.
- Push to trigger builds.
Display Build Status of your project:
- Add an image to your README to display the build status.
- Instructions: Travis Status
Exempli Gratia:
Github API
Github has an incredibly powerful RESTful API. It's currently on version 3 and it allows you to do a lot.
- Api Reference: developer.github.com/v3/libraries/
- The official languages are available are Ruby, .NET, and Javascript, but many third party libraries allow you to use the GitHub API in practically any language you want.
Making Requests
There are some limitations to the API when you make requests unauthenticated, it's rate limited to 60 requests per hour. Although you can generate a personal token, that's pretty useful for testing, personal projects
Also, you can set up OAuth, where your application acts as behalf of a user, i.e. the user will log in via the OAuth flow in your project.
Create and Update via the API
It's possible to create and update:
- Issues
- Pull Requests
- New Repositories
- Gists
Go Ahead man build a cool little project using the GitHub API. You're quarantined anyway, shut up and write some code. ;)
Danger Zone
Local Destructive Operations
git checkout -- <file>If the file is not present in the staging area, it'll be overwritten.
git reset --hard
#tip: use the following to include working area changes in your stash
git stash --include-untracked
Remote Destructive Operations
Many operations can rewrite history:
- rebase
- amend
- reset
If your code is hosted or shared, never run git push -f after any of the above three operations.
Recover Lost Work
- Use ORIG_HEAD (We talked about this earlier)
- Check for repo copies: Github, co-worker
- By default, git keeps dangling (unreferenced) commits for about two weeks. If you need to go back in time and find those commits, you can look in the ref log.
- Its syntax is a bit different.
- HEAD@{2} means the value of HEAD 2 moves ago
❯ git reflog
a45c454 (HEAD -> master) HEAD@{0}: checkout: moving from master to master
a45c454 (HEAD -> master) HEAD@{1}: commit: update bio
73e12f1 HEAD@{2}: commit: rename copy
7b01c58 HEAD@{3}: commit: temp dir
d4a589d HEAD@{4}: reset: moving to d4a589d93e27a49ecdb10a62ff3ffbb8981810a8
2617d51 HEAD@{5}: commit: temp dir
d4a589d HEAD@{6}: commit: wip git-leet-edition
...
That's about it. I guess that's more than enough for you to be a GIT Wizard now. By the way, that first PR getting merged at Crio felt awesome. And it was my last day on 30th April 2020 at Crio as an intern and I'd like to dedicate this blog to Sridher Sir, Rohin, Ashwanth, Pratik and everyone at Crio who made every day there, an amazing learning experience.